February 27, 2014

bold steps

Colorful and Patterned Staircases-
I really want to redo my ugly carpeted staircase.  I love the look of hardwood with white risers, but hate the black scuff marks left behind.  


I found these black and white spanish tiles made by Granada.  I thought how cool would it be to add these to the risers! But reality was that they are too expensive and labor intensive $$$.


I found a different way to get the same effect, stenciling the risers. Using stencils on stair risers is a surefire way to make your stairs stand out with a high-style decorating statement! There are many ways to dress up plain stair risers-including hand painting, decorative tile, lettering and typography, wallpaper, and even fabric!


Here are some great examples of stairs


Morocco-Stencils-Stairs
Allover pattern and border stencils, with their versatility and abundance of different design choices, provide perhaps the best option because they offer so many different options and can be used even by beginners-as you'll see!
Stenciling-Stair-Risers
It is easier to stencil the Moroccan patterns on precut pieces of wood, that would then be later installed on the stair risers.
Stenciled-Stair-Risers
This will make the stenciling very easy and you will be able to do it comfortably at tables, and will not have to worry about squeezing the stencil into a tight space or corner.
Carol Stencil Stairs 1
Begin by painting every other stair riser yellow and white. Then alternate 4 different Moroccan stencil designs on each riser. Use repositionable spray adhesive to hold the stencils in place and use Aura paint from Benjamin Moore for the stenciling. The Aura paint is ideal for stenciling because it provides excellent coverage and dries quickly-allowing you to do multiple layers in quick succession, if necessary. Touched up design areas around the edges with an artist’s brush and topcoated each riser with a water-based urethane when dry to add protection from scuff marks. Pro tip: Use a gardener’s foam kneeling pad to cushion your knees from the hard floor surface. For great stenciling projects go to Painter Girl. Check it out!
Moroccan stencils used for this project from Royal Design Studio: 3015 Endless Moorish Circle, 3014 Moorish Fleur de Lis, 3010S Small Curved Connection, 3012S Small Eastern Lattice

February 20, 2014

stay or sell


Top 5 Projects That Will Get Your Listing Sold Quickly
sponsored by Homes.com 
In today’s competitive housing market, it can be difficult to determine what home improvements to tackle in order to sell your home. You don’t want to invest too much out-of-pocket cash into a home you are trying to sell, but you need to make some improvements to the property to ensure that it shines in the crowd. Where do you even begin? What projects should you tackle first? Which projects give you the most bang for your buck? Homes.com is here to help you answer all of your housing questions and today we will share the top 5 projects that will get your listing sold quickly!

PROJECT 1: DECLUTTER AND ORGANIZE

Decluttering your home is the most important and potentially the most difficult task to accomplish out of all of the projects recommended. But let’s face it. Folded and stored laundry, tidy closets, and clean kitchens simply show better when compared to overflowing laundry piles, messy closets, and cluttered countertops. You may need to rent a storage unit to store your clutter while your house is on the market.
Before tackling the clutter, try to view your home through the eyes of a buyer! Be ruthlessly critical and ruthlessly nosy in each area of your home and tackle accordingly. Buyers will snoop, so be sure to look in every room, every drawer, and every closet making sure they are all clean and tidy. Your kitchen may be gorgeous, but if there are old mouse droppings in a kitchen drawer it will count as a strike against you. Another helpful tip is to go through your closets and pack away any clothing you can part with for the time being. Closets with plenty of open storage give the impression of being more spacious and therefore more appealing.

organize

PROJECT 2: BRIGHTEN EVERYTHING

Homes that feel light and bright will sell faster than homes that feel heavy and dark. To brighten your space, consider doing the following:
  • Clean the windows (interior and exterior)
  • Replace and upgrade lightbulbs
  • Update worn-out light fixtures 
  • Freshen up paint on walls, trim, and ceilings

ligthen and brighten

Tip: When updating light fixtures, before purchasing a new one consider how you might be able to revamp the existing fixture with a can of spray paint and a new shade.

PROJECT 3: SPRUCE UP THE KITCHEN

The kitchen is the heart of every home and can make or break a home sale. Upgrading your appliances and painting dated kitchen cabinetry will improve the desirability of your listing. If these upgrades aren’t within your budget, then consider making smaller updates such as removing outdated wallpaper borders, taking off a few cabinet doors to create “open shelving”, and freshening up the wall color. Homes.com has some fantastic posts in our Idea Gallery that go into further detail on how to freshen up your kitchen on a budget. You might want to check out the following:

PROJECT 4: WELCOME THEM AT THE DOOR

The exterior of your home and your entryway are the first two things that greet home buyers. Welcome them at the door with curb appeal and a clean entryway. To get the exterior of your home ready, pull all weeds, prune bushes, mulch, cut the grass, and invest in a few container planters. The advantage of container gardens is that they can move with you to your new home! You may also consider painting your front door a fresh and inviting color. To get your entryway ready, be sure it is clean and void of clutter, mail, shoes, or excessive coats. However, a few well-placed items for staging purposes are encouraged!
welcome entrance

PROJECT 5:  STAGE IT!

You want to showcase your home in the best possible light and this means taking a bit of the “reality” out of everyday living. If you are still living in the home you are trying to sell, staging can be difficult and inconvenient for your family. However, it is an imperative step that will help your home sell quickly. Consider doing the following when staging your home:
  • Pack away personal photos and other personal items.
  • Purchase fresh and fluffy towels for the bathrooms.
  • Place fresh flowers on tables and nightstands.
  • Freshen up bedding with a new throw or toss pillows.
  • Store any unnecessary furniture items.
  • Keep only two small kitchen appliances on your countertops.


If you follow any Decorating/DIY bloggers like myself, you will notice that all of our home photos are staged. We live the same messy chaotic lives as the rest of the world—complete with paper clutter and laundry piles, but we stage our photos because it simply sells better. Your home will sell faster if it is staged. For more tips on how to stage your home, check out Home Staging Tips from a Real Estate Expert.
Deciding to place your home on the market can be a daunting task, but Homes.com is here to help you every step of the way! Have you had success selling your home quickly in today’s market? We’d love to hear what tips worked for you! Feel free to let us know in the comments below.

February 11, 2014

valentines day glass

I thought that these etched glasses that I found on Thistlewood Farm were a really cute project for Valentines Day or a Wedding/Engagement Shower gift


Etched Valentine’s Glass
(please note:  use gloves when making this project and follow all safety precautions on the label)
Supplies:
  • Dollar Store Glass
  • heart window cling
  • letter stickers
  • etching cream


Step 1:  Cut out window cling
You can find these window clings anywhere.
I saw them both at Hobby Lobby and Michael’s.
You don’t really need the actual cling……you just want the outline.


Step 2:  Add cling and stickers to glass
Position window cling in the center of the glass.
Place letter stickers into the center of the circle.
I just bought regular stickers at Hobby Lobby and took the d and the k out of the package.
To make the plus sign I cut the l in half and added the smaller pieces to make it look like this +.


Step 3:   Apply etching cream with a brush
Leave on for about 45 seconds.
I used Armour Etch.
Note:  Each etching cream may be slightly different.  
Be sure to follow directions and safety precautions on the bottle of etching cream you bought.

Step 4:  Wash off etching cream with soap and water.
Wash off all cream from glass.
Peel off window cling sticker and letter and plus sign stickers.
You should be able to see the etched surface (this is my favorite part)!
Wash glass with soap and water thoroughly again to make sure all etching cream is removed.


February 3, 2014

tips on how to paint furniture

I have refinished a lot of pieces which consisted of real wood, veneer, and laminate. When painting furniture it is important to use the right tools and paint. I've learned a lot over the years and now I am here to share my tips.


tips:
  • buy the right paint for your project. I found that Benjamin Moore Advance Waterborne Alkyd Paint has been the best on furniture. Why?  It's durable as an oil, it goes on like an oil paint, but finishes like an enamel paint.  It has a low odor and it easily cleans up with water and soap.
  • always lightly sand the piece first with fine grit sand paper.  It's ok to use an electric sander on the big areas. 
  • wipe off all the dust
  • prime with a Benjamin Moore Primer, it fills any small imperfections
  • sand again to remove any brush strokes or bumps
  • use the right brushes.  I always edge first before I roll my pieces. Use a cabinet foam roller to avoid brush strokes
  • Use an oil rub on poly, if you are not using a white paint (it will yellow over time).  It goes on smoothly with no bubbles! You can use multiple coats on the top of a piece that gets a lot of use


add molding to bathroom mirror

I wanted to update the kids bathroom on the cheap.  I came across a great tutorial by 'In My Own Style' on adding molding to builder grade mirrors. This was the easiest part to the whole bathroom update.


Tools:
  • liquid nails
  • 5 1/2" mdf board
  • 3 1/2" mdc board
  • white gloss paint
  • washers to replace the mirror clips
  • painter tape


tips:

  • measure before you go to Lowes and have an employee to make the cuts for you
  • paint the back of the mdf boards so mirror doesn’t reflect unfinished wood
  • use the painters tape to hold the boards in place for 24 hours to dry
  • use the washers in place of the mirror clips to have a flat surface for the boards


kids bathroom tour

inspiration-


after-

I loved the Osborne & Little Nest in Show wall paper in the inspiration picture, but I knew that it wasn't suitable for a kids bathroom at $180 a roll.  So I found these dog stencils at Just Stencils and painted the room with my favorite doggies in a random pattern.


I painted the vanities a glossy black and added vintage styled acrylic knobs 


I found a great project on how to add molding to your builder grade mirrors


I bought a new black and white simple light fixture


A simple white shower curtain with the black horizontal stiles finish off the room


The cream walls show off the black dog stencils


The wine boxes that I bought at Liqour World for $5 are used for storage above the toilet.  The shutters add to the vintage feel to the bathroom and allow for light and privacy when needed


The towel rack was made out of a scrap 1 X 4 and purchased cast iron hooks from ebay

*Photo Credits to Dougherty Photo Designs

master bedroom tour

before-
my gripes: the ceiling fan; brown, brown, brown, angled ceilings 


the potential: very large; on suite bathroom; his and hers closets; a walk in closet

inspiration-


after-


I choose dark grey 'Seal Grey' walls to make it feel more cozy.  The room was so big and got a lot of natural light, therefore I could get away with the darker wall color.


I kept the rest of the room bright and white.  The chevron pillows I made to bring some color and detail to the bedding.  I would like to find two mirrors for behind the nightstands as shown in the inspiration picture above. 


I added an Ikea wicker chair to the corner of the room and the added pillows for comfort. The off white velvet drapes block the sun and the cold. 

*Photo Credits to Dougherty Photo Designs

monogram canvas art

I saw this for sale in Etsy.com and it cost $50! I thought, I can make that!


Tools:

  • 1 art canvas from AC Moores of any size
  • black fabric paint
  • yard decorative fabric or less depending on size of canvas
  • staple gun
  • round sponge
  • initials printed from computer
Steps:
  1. lay your canvas face down on the wrong side of the fabric
  2. cut the fabric around the canvas leaving 2 inch border 
  3. start at one side of the canvas and stable your fabric to the canvas inner edge
  4. on the opposite side of the canvas, pull the fabric tight (be careful not to stretch the fabric) and stable it to the inner edge
  5. now staple the top and bottom following step #4
  6. mark the middle of the canvas with a pencil
  7. with a pencil trace the cut out monogram on to the middle of the canvas
  8. paint the monogram with the black fabric paint using an art paint brush
  9. pour some black paint onto a paper plate and dip the round sponge into it and start placing the circles around the initials


girls room tour

before-

my gripes: it was being used as an office and there was a large see through picture window looking two stories down into the foyer


the potential: the large bay window; the size was good; and a large closet

Inspiration-


after-


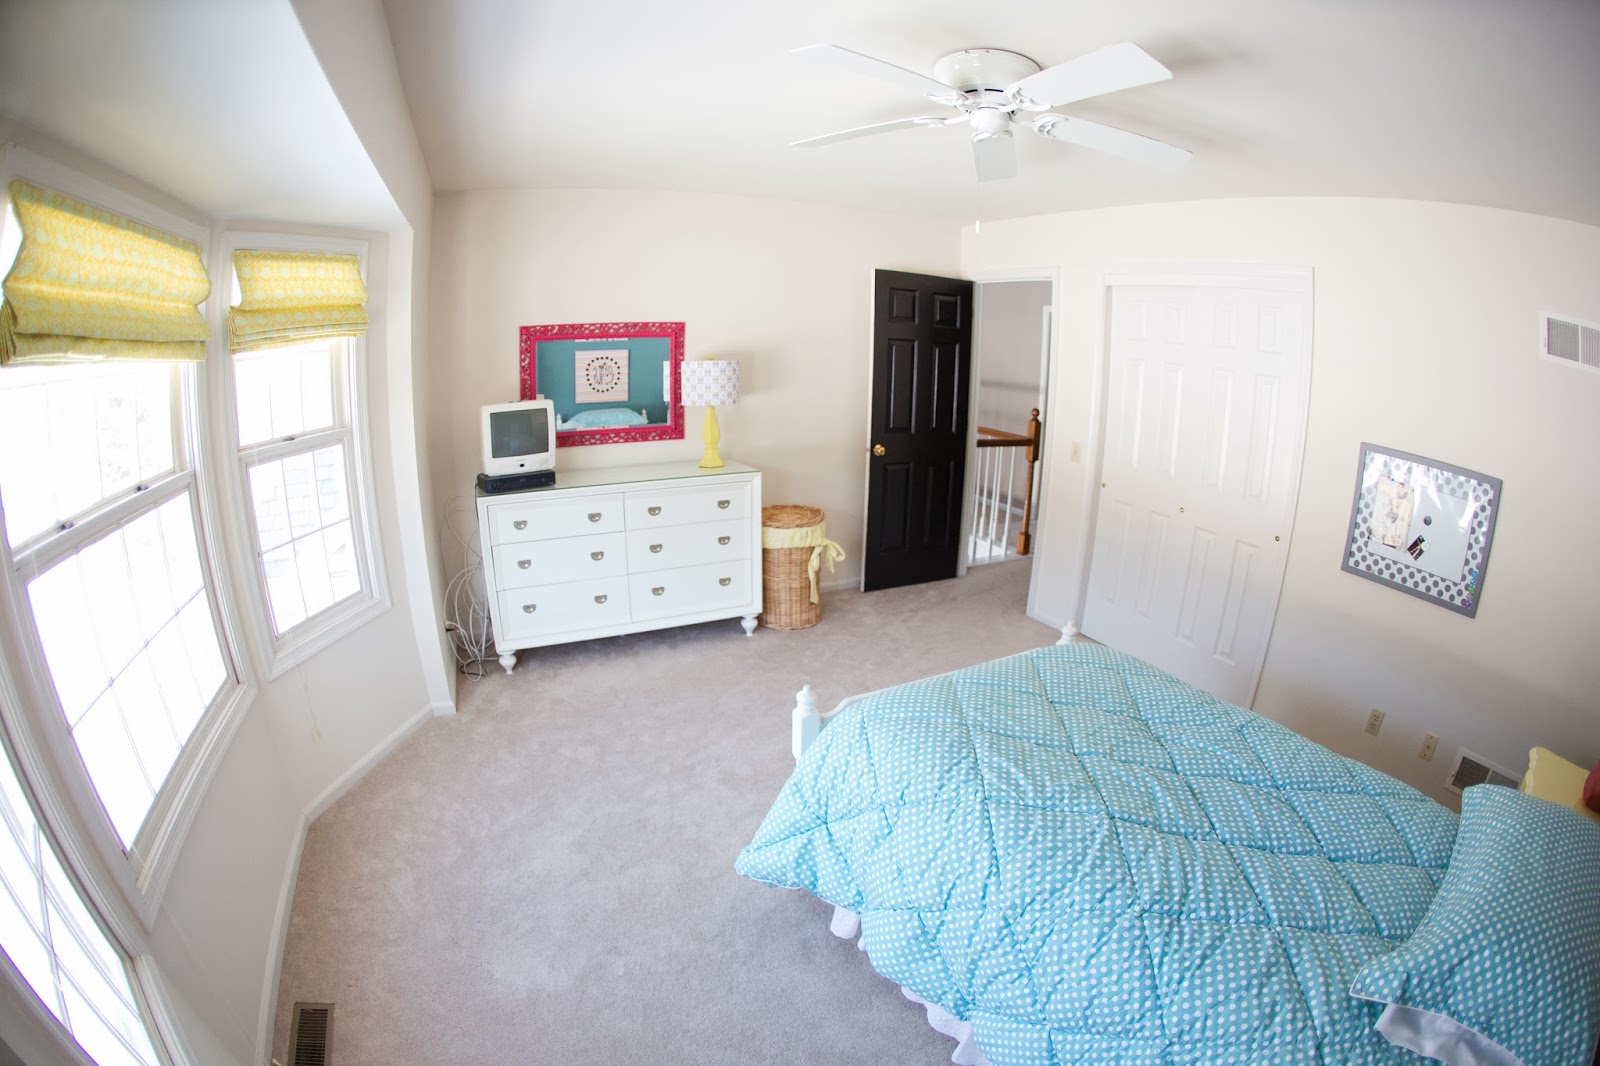
I painted an accent wall with 'Smoked Turquoise' and painted the others with 'Bone White' .


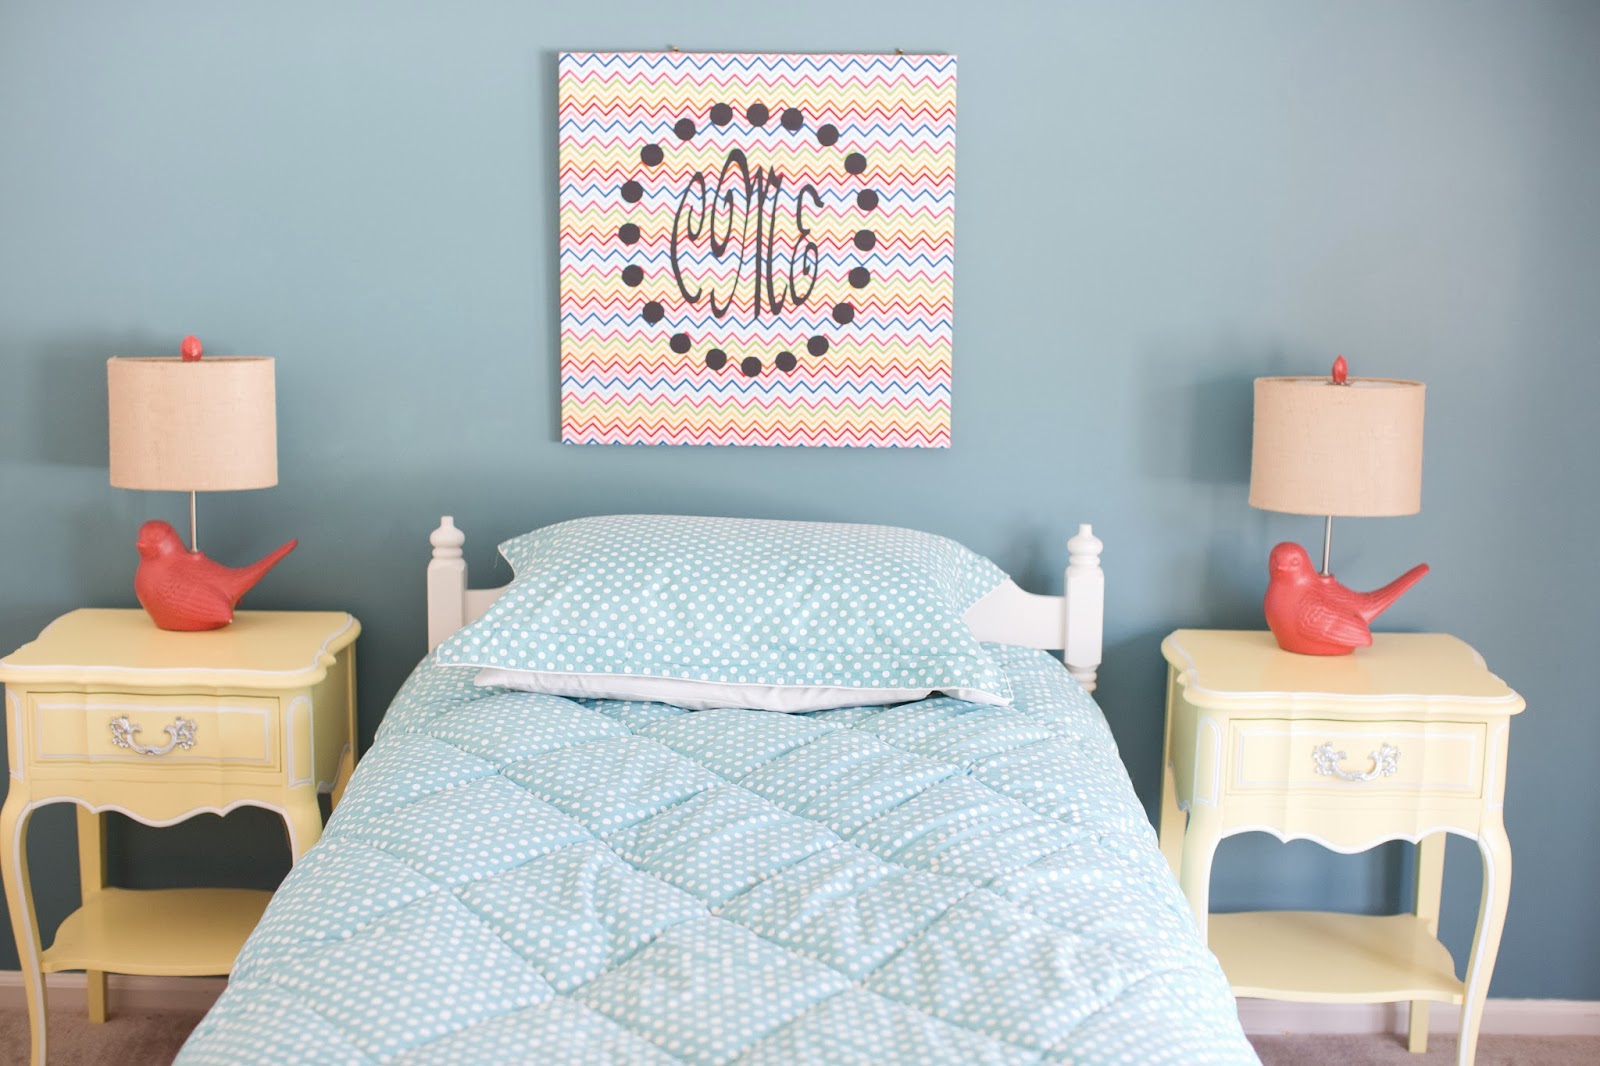
I liked the color pallet of turquoise, yellow, and pink for a little girls room. The monogram canvas above the bed was made using fabric and an art canvas.


We dry walled the picture window,  so we could have a wall for her dresser and mirror.


I found a silver mirror in my basement and spray painted with a hot pink.  The lamp was also spray painted yellow to match the night stands.


I found these great bird lamps at Marshals which bring a lot of color and fun to the room.


I found these great night stands at a local antique shop 2 for $125! I refinished them with a soft creamy yellow paint and edged them in white.  

*Photo Credits to Dougherty Photo Designs
back to top